Sources: (1-11) Pal, Gosalvez and Sato, Jpn. J. Appl. Phys. 49 (2010) 056702
(12-15) Pal, Gosalvez and Sato, submitted to JMM (2010)
Tutorial II-1: Square ashtray array
1. Define silicon sample:
Si(100) with <110> flat, 600x600 μm2, NOC = 256.
2. Apply nitride/oxide masks:
“demo-II-1-1.bmp” apply as OXIDE.
“demo-II-1-2.bmp” apply as NITRIDE.
3. Wet etching:
Use “TMAH+Triton 25 wt%, 0.1 v/v 80 C” for 40 μm (etch by depth).
4. Passivate the etched regions by a LOCOS process:
“demo-II-1-3.bmp” apply as OXIDE.
5. Remove the nitride mask:
Select “nitride” as the mask material and press on the “Remove layer” button.
6. Wet etching:
Use “TMAH+Triton 25 wt%, 0.1 v/v 80 C” for 40 μm (etch by depth).
7. Remove the oxide mask:
Select “oxide” as the mask material and press on the “Remove layer” button.
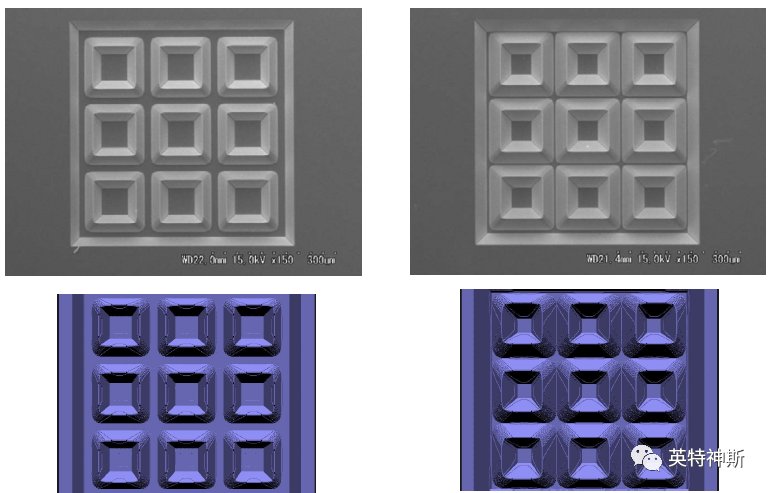
Figure 1: Comparison between experiment (top) and simulation (bottom) for Tutorial II-1. The etch
depth is (approx.): 30 μm (left) and 44 μm (right).
Tutorial II-2: Circular ashtray array
1. Define silicon sample:
Si(100) with <110> flat, 800x800 μm2, NOC = 256.
2. Apply nitride/oxide masks:
“demo-II-2-1.bmp” apply as OXIDE.
“demo-II-2-2.bmp” apply as NITRIDE.
3. Wet etching:
Use “TMAH+Triton 25 wt%, 0.1 v/v 80 C” for 30 μm (etch by depth).
4. Passivate the etched regions by a LOCOS process:
“demo-II-2-3.bmp” apply as OXIDE.
5. Remove the nitride mask:
Select “nitride” as the mask material and press on the “Remove layer” button.
6. Wet etching:
Use “TMAH+Triton 25 wt%, 0.1 v/v 80 C” for 30 μm (etch by depth).
7. Remove the oxide mask:
Select “oxide” as the mask material and press on the “Remove layer” button.

Figure 2: Comparison between experiment (top) and simulation (bottom) for Tutorial II-2. The etch
depth is approx. 30 μm.
Tutorial II-3: (111) V-grooves
1. Define silicon sample:
Si(100) with <110> flat, 542x400 μm2, NOC = 256.
2. Apply nitride/oxide masks:
“demo-II-3-1.bmp” apply as OXIDE.
“demo-II-3-2.bmp” apply as NITRIDE.
3. Wet etching:
Use “TMAH 25 wt 80 C” for 45 min (etch by time).
4. Passivate the etched regions by a LOCOS process:
“demo-II-3-3.bmp” apply as OXIDE.
5. Remove the nitride mask:
Select “nitride” as the mask material and press on the “Remove layer” button.
6. Wet etching:
Use “TMAH 25 wt 80 C” until 90 min (additional 50 min).
7. Remove the oxide mask:
Select “oxide” as the mask material and press on the “Remove layer” button.
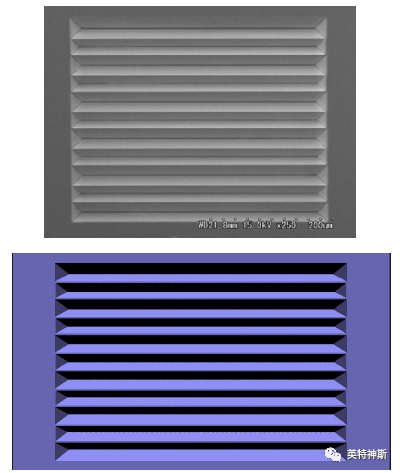
Figure 3: Comparison between experiment (top) and simulation (bottom) for Tutorial II-3. The etch
depth is approx. 21 μm (45 min).
Tutorial II-4: (110) V-grooves
1. Define silicon sample:
Si(100) with <110> flat, 620x620 μm2, NOC = 256.
2. Apply nitride/oxide masks:
“demo-II-4-1.bmp” apply as OXIDE.
“demo-II-4-2.bmp” apply as NITRIDE.
3. Wet etching:
Use “TMAH+Triton 25 wt%, 0.1 v/v 80 C” for 38 min (etch by time).
4. Passivate the etched regions by a LOCOS process:
“demo-II-4-3.bmp” apply as OXIDE.
5. Remove the nitride mask:
Select “nitride” as the mask material and press on the “Remove layer” button.
6. Wet etching:
Use “TMAH+Triton 25 wt%, 0.1 v/v 80 C” until 76 min (additional 38 min).
7. Remove the oxide mask:
Select “oxide” as the mask material and press on the “Remove layer” button.

Figure 4: Comparison between experiment (top) and simulation (bottom) for Tutorial II-4. The etch
depth is approx. 21 μm (38 min).
Note: Simulation figure on the right obtained using a <100> flat, 542x400 μm2, the masks defined in Tutorial II-3 and, 38 and 76 min etching times. The roughness on the (110) facets of the left simulation figure are due to mask transfer inaccuracies for lines with an inclination of 45 deg.
Tutorial II-5: Concentric squares
1. Define silicon sample:
Si(100) with <110> flat, 500x500 μm2, NOC = 256.
2. Apply nitride/oxide masks:
“demo-II-5(B)-1.bmp” apply as OXIDE.
“demo-II-5(B)-2.bmp” apply as NITRIDE.
3. Wet etching:
Use “TMAH+Triton 25 wt%, 0.1 v/v 80 C” for 75 min (etch by time).
4. Passivate the etched regions by a LOCOS process:
“demo-II-5(B)-3.bmp” apply as OXIDE.
5. Remove the nitride mask:
Select “nitride” as the mask material and press on the “Remove layer” button.
6. Wet etching:
Use “TMAH+Triton 25 wt%, 0.1 v/v 80 C” until 150 min (add 75 min).
7. Remove the oxide mask:
Select “oxide” as the mask material and press on the “Remove layer” button.
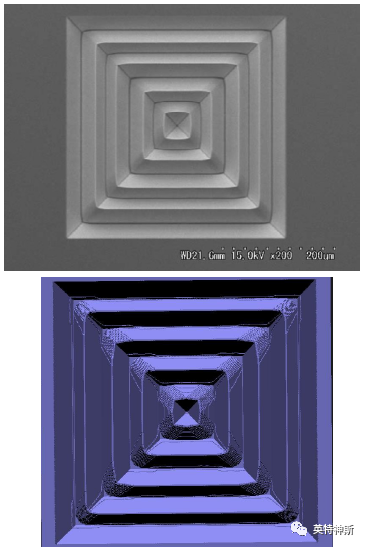
Figure 5: Comparison between experiment (top) and simulation (bottom) for Tutorial II-5. Etch time:
75 min (for each of the two etching steps).
Note: Two slightly different mask sets are provided. The simulation results in Fig. 5 correspond to set “B”. For set “A” use 75 and 130 (additional 55) min as the etching times.
Tutorial II-6: Concentric circles
1. Define silicon sample:
Si(100) with <110> flat, 300x300 μm2, NOC = 256.
2. Apply nitride/oxide masks:
“demo-II-6(B)-1.bmp” apply as OXIDE.
“demo-II-6(B)-2.bmp” apply as NITRIDE.
3. Wet etching:
Use “TMAH+Triton 25 wt%, 0.1 v/v 80 C” for 35 min (etch by time).
4. Passivate the etched regions by a LOCOS process:
“demo-II-6(B)-3.bmp” apply as OXIDE.
5. Remove the nitride mask:
Select “nitride” as the mask material and press on the “Remove layer” button.
6. Wet etching:
Use “TMAH+Triton 25 wt%, 0.1 v/v 80 C” until 75 min (add 40 min).
7. Remove the oxide mask:
Select “oxide” as the mask material and press on the “Remove layer” button.
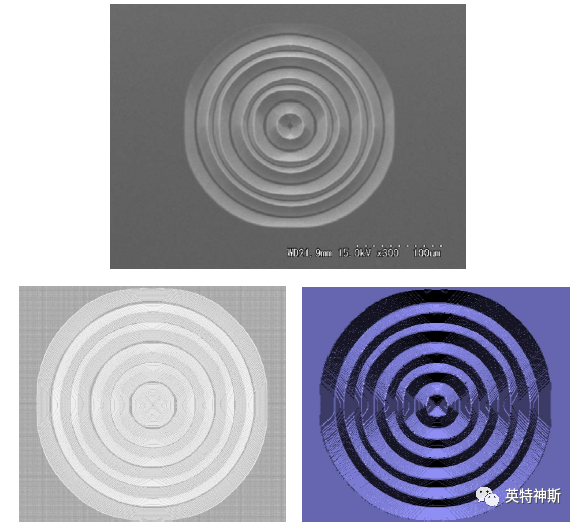
Figure 6: Comparison between experiment (top) and simulation (bottom) for Tutorial II-6. Etch time:
35 and 40 min for the first and second etching steps, respectively.
Note: Two slightly different mask sets are provided. The simulation results in Fig. 6 correspond to set “B”. For set “A” use 40 and 80 (additional 40) min as the etching times.
Tutorial II-7: Perpendicular and diagonal microchannels
1. Define silicon sample:
Si(100) with <110> flat, 800x800 μm2, NOC = 256.
2. Apply nitride/oxide masks:
“demo-II-7-1.bmp” apply as NITRIDE.
“demo-II-7-2.bmp” apply as OXIDE.
3. Wet etching to create the channels:
Use “TMAH+Triton 25 wt%, 0.1 v/v 80 C” for 55 min (etch by time).
4. Passivate the etched regions by a LOCOS process:
“demo-II-7-3.bmp” apply as OXIDE.
5. Remove the nitride mask:
Select “nitride” as the mask material and press on the “Remove layer” button.
6. Wet etching to create the reservoirs, underetching is required:
Use “TMAH 25 wt 80 C” until 170 min (additional 115 min).
7. Remove the oxide mask:
Select “oxide” as the mask material and press on the “Remove layer” button.

Figure 7: Comparison between experiment (top) and simulation (bottom) for Tutorial II-7.
Tutorial II-8: Suspended diagonal microchannel
1. Define silicon sample:
Si(100) with <110> flat, 600x600 μm2, NOC = 256.
2. Apply nitride/oxide masks:
“demo-II-8-1.bmp” apply as NITRIDE.
“demo-II-8-2.bmp” apply as OXIDE.
3. Wet etching to create the channels:
Use “TMAH+Triton 25 wt%, 0.1 v/v 80 C” for 65 min (etch by time).
4. Passivate the etched regions by a LOCOS process:
“demo-II-8-3.bmp” apply as OXIDE.
5. Remove the nitride mask:
Select “nitride” as the mask material and press on the “Remove layer” button.
6. Wet etching to create the reservoirs, underetching is required:
Use “TMAH 25 wt 80 C” until 210 min (additional 145 min).
7. Remove the oxide mask:
Select “oxide” as the mask material and press on the “Remove layer” button.
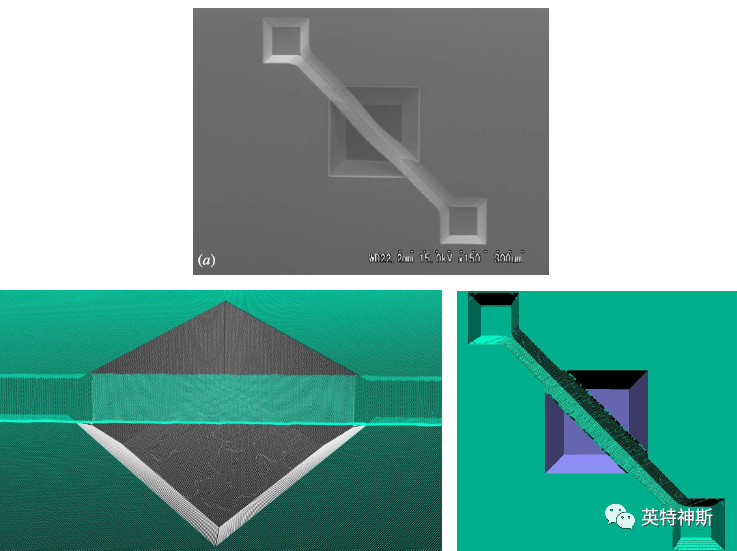
Figure 8: Comparison between experiment (top) and simulation (bottom) for Tutorial II-8.
Tutorial II-9: Short suspended serpentine microchannel
1. Define silicon sample:
Si(100) with <110> flat, 550x380 μm2, NOC = 256.
2. Apply nitride/oxide masks:
“demo-II-9-1.bmp” apply as NITRIDE.
“demo-II-9-2.bmp” apply as OXIDE.
3. Wet etching to create the serpentine channel:
Use “TMAH+Triton 25 wt%, 0.1 v/v 80 C” for 60 min (etch by time).
4. Passivate the etched regions by a LOCOS process:
“demo-II-9-3.bmp” apply as OXIDE.
5. Remove the nitride mask:
Select “nitride” as the mask material and press on the “Remove layer” button.
6. Wet etching to release the channel, underetching is required:
Use “TMAH 25 wt 80 C” until 220 min (additional 160 min).
7. Remove the oxide mask:
Select “oxide” as the mask material and press on the “Remove layer” button.

Figure 9: Comparison between experiment (top) and simulation (bottom) for Tutorial II-9.
Tutorial II-10(A): Serpentine microchannel
1. Define silicon sample:
Si(100) with <110> flat, 820x630 μm2, NOC = 256.
2. Apply oxide mask:
“demo-II-10(A)-1.bmp” apply as OXIDE.
3. Wet etching to create the serpentine channel:
Use “TMAH+Triton 25 wt 80 C” for 30 μm (etch by depth), see Fig. 10(i).
Use “TMAH+Triton 25 wt%, 0.1 v/v 80 C” for 22 μm (etch by depth), see Fig. 10(ii).
4. Remove the oxide mask:
Select “oxide” as the mask material and press on the “Remove layer” button.
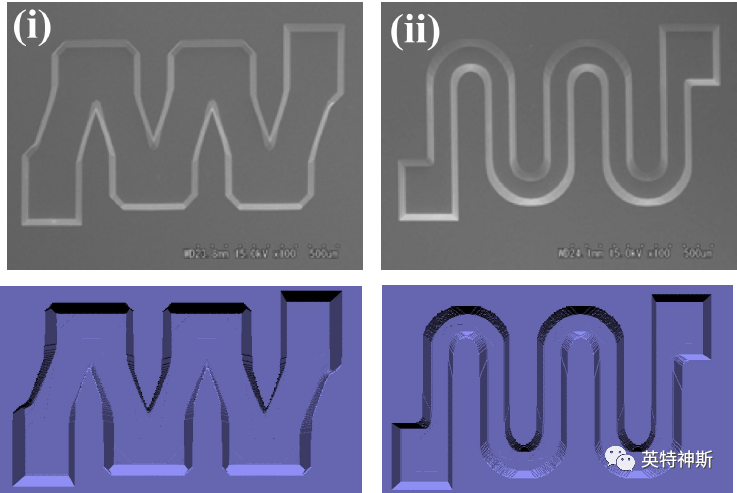
Figure 10(A): Comparison between experiment (top) and simulation (bottom) for Tutorial II-10(A).
Left: etching in TMAH 25 wt 80 C. Right: etching in TMAH 25 wt% + 0.1 v/v Triton 80 C.
Tutorial II-10(B): Suspended serpentine microchannel
1. Define silicon sample:
Si(100) with <110> flat, 820x630 μm2, NOC = 256.
2. Apply nitride/oxide masks:
“demo-II-10(B)-1.bmp” apply as NITRIDE.
“demo-II-10(B)-2.bmp” apply as OXIDE.
3. Wet etching to create the serpentine channel:
Use “TMAH+Triton 25 wt%, 0.1 v/v 80 C” for 30 μm (etch by depth).
4. Passivate the etched regions by a LOCOS process:
“demo-II-10(B)-3.bmp” apply as OXIDE.
5. Remove the nitride mask:
Select “nitride” as the mask material and press on the “Remove layer” button.
6. Wet etching to release the channel, underetching is required:
Use “TMAH 25 wt 80 C” for 80 μm (etch by depth).
7. Remove the oxide mask:
Select “oxide” as the mask material and press on the “Remove layer” button.
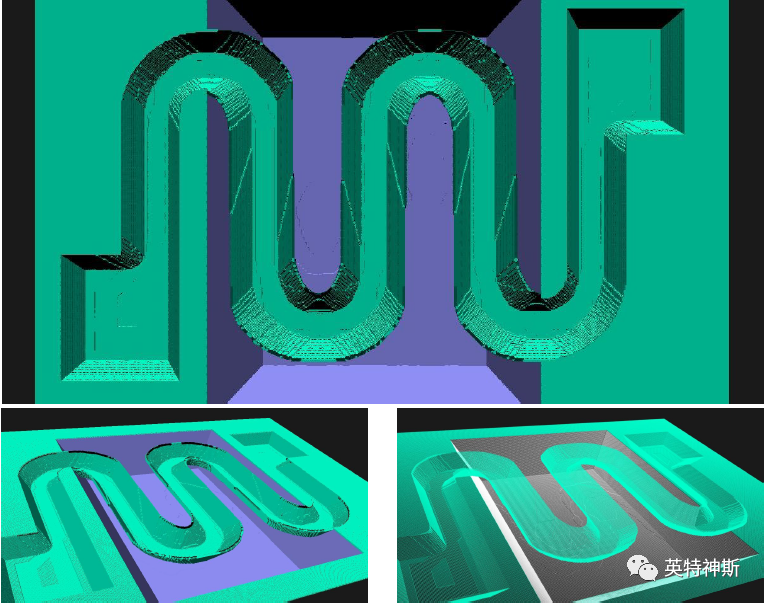
Figure 10(B): Different views of the simulation result for Tutorial II-10(B).
Tutorial II-11: Cantilever with rounded support
1. Define silicon sample:
Si(100) with <110> flat, 662x556 μm2, NOC = 256.
2. Apply nitride mask:
“demo-II-11-1.bmp” apply as NITRIDE.
3. Wet etching to create the serpentine channel:
Use “TMAH+Triton 25 wt 80 C” for 40 μm (etch by depth), left Fig. 12.
Use “TMAH+Triton 25 wt%, 0.1 v/v 80 C” for 35 μm (etch by depth), right Fig. 12.
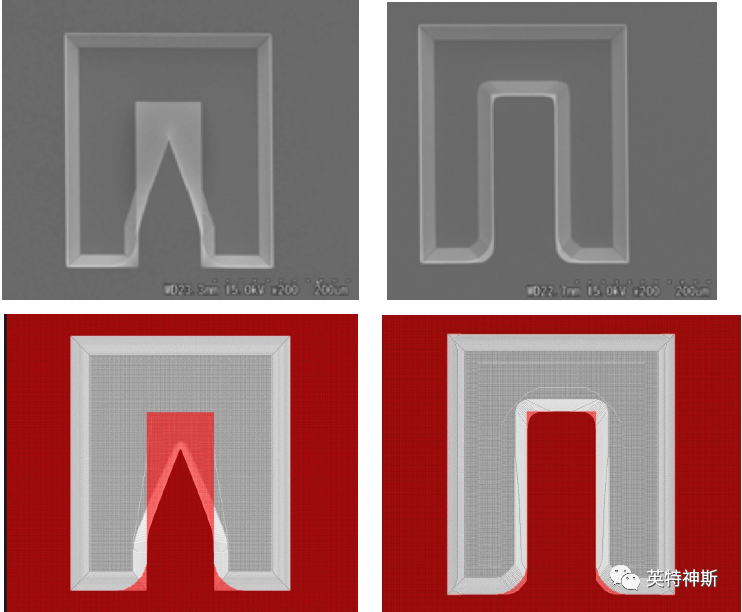
Figure 11: Comparison between experiment (top) and simulation (bottom) for Tutorial II-12. Left:
etching in TMAH 25 wt 80 C. Right: etching in TMAH 25 wt% + 0.1 v/v Triton 80 C.
Tutorial II-12: Diagonal cantilever basin
1. Define silicon sample:
Si(100) with <110> flat, 450x450 μm2, NOC = 184.
2. Apply nitride/oxide masks:
“demo-II-12-1.bmp” apply as NITRIDE.
“demo-II-12-2.bmp” apply as OXIDE.
3. Wet etching to create the rectangular basin:
Use “TMAH+Triton 25 wt%, 0.1 v/v 80 C” for 25 μm (etch by depth).
4. Passivate the etched regions by a LOCOS process:
“demo-II-12-3.bmp” apply as OXIDE.
5. Remove the nitride mask:
Select “nitride” as the mask material and press on the “Remove layer” button.
6. Wet etching to release the cantilever, underetching is required:
Use “TMAH 25 wt 80 C” for 110 μm (etch by depth).

Figure 12: Comparison between experiment (top) and simulation (bottom) for Tutorial II-12. Bottomleft: after step 3. Bottom-center and bottom-right: after step 6.
Tutorial II-13: Standard cantilever basin
1. Define silicon sample:
Si(100) with <110> flat, 450x450 μm2, NOC = 184.
2. Apply nitride/oxide masks:
“demo-II-13-1.bmp” apply as NITRIDE.
“demo-II-13-2.bmp” apply as OXIDE.
3. Wet etching to create the rectangular basin:
Use “TMAH 25 wt 80 C” for 25 μm (etch by depth).
4. Passivate the etched regions by a LOCOS process:
“demo-II-13-3.bmp” apply as OXIDE.
5. Remove the nitride mask:
Select “nitride” as the mask material and press on the “Remove layer” button.
6. Wet etching to release the cantilever, underetching is required:
Use “TMAH 25 wt 80 C” for 110 μm (etch by depth).

Figure 13: Comparison between experiment (top) and simulation (bottom) for Tutorial II-13. Bottomleft: after step 4. Bottom-center and bottom-right: after step 6.
Tutorial II-14: Square bucket array
1. Define silicon sample:
Si(100) with <110> flat, 800x800 μm2, NOC = 184.
2. Apply nitride/oxide masks:
“demo-II-14-1.bmp” apply as NITRIDE.
“demo-II-14-2.bmp” apply as OXIDE.
3. Wet etching to create the rectangular basin:
Use “TMAH+Triton 25 wt%, 0.1 v/v 80 C” for 25 μm (etch by depth).
4. Passivate the etched regions by a LOCOS process:
“demo-II-14-3.bmp” apply as OXIDE.
5. Remove the nitride mask:
Select “nitride” as the mask material and press on the “Remove layer” button.
6. Wet etching to release the cantilever, underetching is required:
Use “TMAH 25 wt 80 C” for 30 μm (etch by depth).
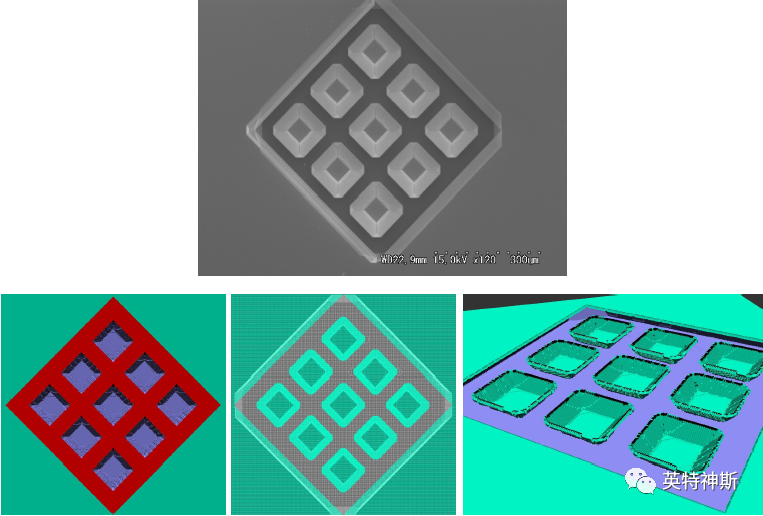
Figure 14: Comparison between experiment (top) and simulation (bottom) for Tutorial II-14. Bottomleft: after step 3. Bottom-center and bottom-right: after step 6.
Tutorial II-15: Rounded bucket array
1. Define silicon sample:
Si(100) with <110> flat, 650x650 μm2, NOC = 184.
2. Apply nitride/oxide masks:
“demo-II-15-1.bmp” apply as NITRIDE.
“demo-II-15-2.bmp” apply as OXIDE.
3. Wet etching to create the rectangular basin:
Use “TMAH+Triton 25 wt%, 0.1 v/v 80 C” for 25 μm (etch by depth).
4. Passivate the etched regions by a LOCOS process:
“demo-II-15-3.bmp” apply as OXIDE.
5. Remove the nitride mask:
Select “nitride” as the mask material and press on the “Remove layer” button.
6. Wet etching to release the cantilever, underetching is required:
Use “TMAH 25 wt 80 C” for 30 μm (etch by depth).
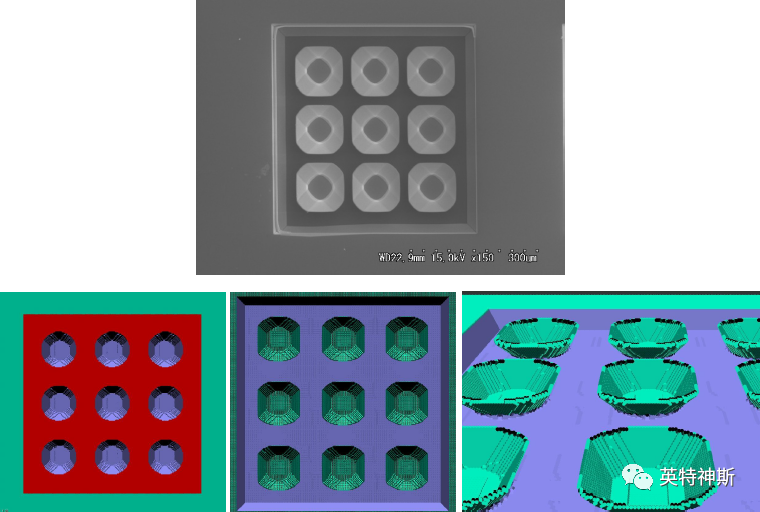
Figure 15: Comparison between experiment (top) and simulation (bottom) for Tutorial II-15. Bottomleft: after step 3. Bottom-center and bottom-right: after step 6.
扫二维码用手机看


 电话
电话 咨询
咨询 Top
TopCopyright © 2022 江苏英特神斯科技有限公司 版权所有. 苏ICP备08107867号 网站建设:中企动力 南京 SEO